Recipes
Always Add Lemon by Danielle Alvarez
How to make a simple apple galette from scratch
19 Nov 2020 | Danielle Alvarez
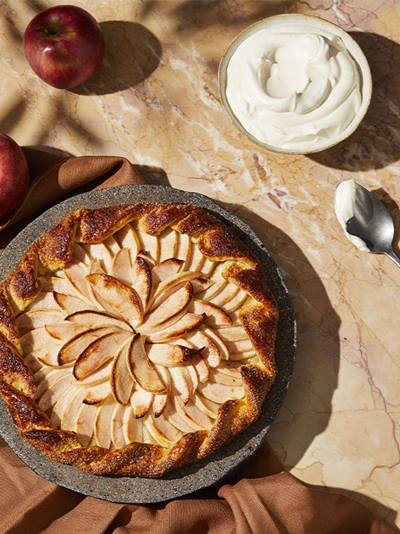
Not only is this my favourite rendition of apple in tart form, but what makes it even more perfect is that the entire apple gets used. Cores and skins are cooked into a syrup that glazes the finished tart and gives you the most beautiful sheen, which also tastes like apple. If you use a different fruit for this recipe, simply glaze with melted fruit jam for the same effect.
Try and find unwaxed, new-season apples for this recipe. My absolute favourite variety is one called crimson snow, and not just because of its romantic name. It’s fragrant, sweet and sour, and its skins are the most beautiful colour I have ever seen in an apple: an almost purple-pink crimson, as the name suggests. Use your favourite variety, or the best, freshest apple you can find here.
You can also swap out the apples for plums, peaches, apricots, nectarines, figs or whatever sliceable fruit you like. Replace the calvados with a liqueur flavoured with whatever fruit you’re using, such as kirsch for cherries.
How to make a simple apple galette
|
Serves 8-10
INGREDIENTS 1 quantity Flaky dough (see below)1 kg (2 lb 3 oz) apples of your choice ½ tablespoon plain (all-purpose) flour 20 g (¾ oz) butter 1 tablespoon lemon juice 15 g (½ oz) caster (superfine) sugar, plus 1 tablespoon extra 1 tablespoon calvados (optional) 1 egg, beaten with a splash of cream, full-cream (whole) milk or water ice cream, Crème fraîche or lightly whipped cream, to serve Apple peel glaze 50 g (1¾ oz) caster (superfine) sugar |
METHOD Follow the recipe to make the dough, then roll it out into a circular shape about 2 mm (⅛ in) thick and place it on a piece of baking paper. Refrigerate. Preheat the oven to 200°C (400°F) and place a baking stone on the middle shelf. Next, prepare your apples by peeling, quartering and coring them. Place the peels and cores in a small saucepan with the sugar for the apple glaze. Add 300 ml (10 fl oz) water, cover with a lid and simmer over a medium heat for 15 minutes. Take your apple quarters and cut each quarter into 6–8 thin slices. Keep the slices together so you can arrange them nicely on the dough. Sprinkle the prepared dough with the flour then spread it out evenly over the base using your hand. Arrange the apple slices on top in whatever pattern looks nicest to you. Concentric circles always look good, starting from the outside in, making sure you tightly fill the space with fruit. (It will shrink and move as it cooks, so make sure you use plenty.) Leave a 2 cm (¾ in) edge. Melt the butter and mix in the lemon juice, sugar and calvados, if using. Spoon this mixture over the top of the apples only. Fold the edge of the dough up around the fruit. Brush the egg mixture over the folded edge of dough and sprinkle with the extra sugar. Try to land as much sugar as possible directly on the crust and as little as possible on the baking paper. By this point, your apple peel glaze should be ready. Strain it into a clean saucepan and put it back on the stove to simmer and reduce until thickened and ‘glazy’. You only need about a tablespoon or so. Transfer the galette to the oven, sliding it onto the baking stone using the baking paper. Immediately reduce the oven temperature to 180°C (350°F) and bake for 30 minutes. After 30 minutes, increase the temperature to 200°C (400°F) and continue baking for 20–30 minutes until the crust is beautifully golden and the apples are browned on the edges. At this stage, flip a baking tray upside down and carefully pull the galette onto the baking tray using the baking paper. Transfer to a wire rack to cool and, finally, pull the baking paper out from underneath. If you leave the paper underneath, the base of the galette will steam and go soft. When cooled but still slightly warm, brush your apple glaze on top of the apples. Enjoy with ice cream, crème fraîche, lightly whipped cream or just on its own.
|
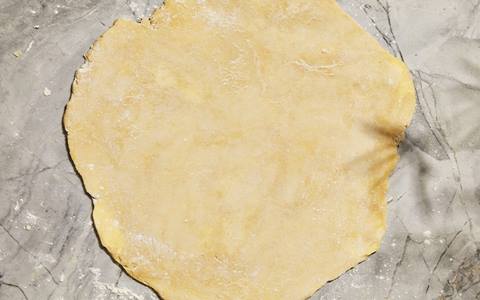
How to make a flaky dough
|
Makes 345 g (12 oz), enough for 8–10 slices 65–80 ml (2¼–2½ fl oz) cold water 100 g (3½ oz) cold butter 170 g (6 oz) plain (all-purpose) flour, plus extra for dusting 1 teaspoon caster (superfine) sugar ½ teaspoon salt 1 egg, beaten with a splash of cream, full-cream (whole) milk or water Note You can also make the dough and freeze it, but you’ll need to defrost it overnight in the fridge before you use it. Equipment Baking stone, rolling pin |
METHOD The key to making good dough is to keep everything super, super cold. I usually measure out my water first and put it in the freezer. I will also cut my butter and just toss with the dry ingredients and put that bowl in the freezer too for about 5 minutes. You’ll also find what brand of butter works for you. A butter with a higher fat-to-liquid ratio is best, because it stays super hard even in warmer temperatures. Once everything is very cold, begin to crumble the butter into the flour using your fingertips. Work the butter into the flour until you have bean-sized lumps. Begin to rub the dough between the palms of your hands as if trying to wipe your hands off. This is what creates those thin sheets of butter that form flaky layers. Add half the cold water and mix with your hands. Try not to stretch or knead the dough; you just want it to come together. At this stage, I like to dump it onto a bench so I can press the dough together. If it comes together easily without any dry, floury spots, then it has enough water. If there are some powdery, dry clumps, add a bit more water until everything comes together. Wrap the dough in plastic wrap and press it into a disc. Rub the outside of the plastic wrap to create a smooth edge (this will help get a more even circle when rolling it out). Refrigerate to cool and rest for at least 30 minutes. If you have a marble benchtop, that is ideal for rolling out pastry as it stays cold. A wooden bench has the advantage of not being sticky. Whatever you have, try to find a space in your kitchen with enough flat surface to give you room to move. When the dough is still cold, but has warmed enough to be slightly pliable, dust it with flour. Roll the dough out from the centre in all directions, trying to keep the round shape as much as possible. I purposely wrote this recipe to give you enough extra dough so that you can roll it out wider than you need to then cut a neat round of dough, so don’t worry about the edges being cracked or uneven. Continue rolling and rotating the dough to ensure it doesn’t stick, until it reaches a diameter of 33 cm (13 in) and a thickness of 2 mm (⅛ in). Use a little extra flour when rolling to prevent it sticking, but don’t throw handfuls of flour at it. Trim the edges so you are left with a neat circle (but not too perfect). Gently roll the dough up on a rolling pin and place it on a piece of baking paper. Transfer the baking paper and dough to a round pizza pan. If you don’t have a pizza pan, you’ll just lift the baking paper straight onto a baking stone when ready to bake. This is when you will add your toppings. As far as rolling up the edges, you can make flat folds or elaborate, decorative edges, but my preferred fold is a pretty crimp, which I always think makes the humble galette look much more professional, but if that’s not your vibe, make it rustic. To make said crimp, start at any point along the edge and fold a small section over itself to create a crust about 2 cm (¾ in) wide (I like a thick crust). Continue folding the dough over on itself to create a pretty fold. If you don’t want to bake the galette straight away, you can refrigerate it for up to 24 hours at this point, and a bit of chill time is preferred to help firm up the dough. Once you’ve added the topping, bake within the next few hours to prevent the crust from getting soggy. You want to bake this in a hot oven, and by hot I mean 200–220°C (400–430°F). This is what gives you that gorgeous deep golden and caramelised crust. Before going into the oven, brush the edge with the egg wash. Transfer the galette to the oven, either on the pizza pan on top of the baking stone, or place the galette, still on its baking paper, directly on the stone. Drop the oven temperature to 180°C (350°F) and bake for 30 minutes. If you are using a pizza pan, carefully hold the pan with an oven mitt or tea towel (dish towel) and, holding the baking paper on the opposite side, slide the galette off the tray and place it directly on the baking stone. Increase the oven temperature to 200°C (400°F) and continue baking for 20–30 minutes until the crust and filling are golden. Once baked, flip a baking tray upside down and pull your galette, using the baking paper, off the stone and onto the tray. Transfer to a wire rack to cool and, finally, pull the baking paper out from underneath the galette. If you leave the baking paper underneath, the crust will steam and the pastry won’t be crisp.
|
This recipe is extracted from Always Add Lemon by Danielle Alvarez
Available now at bookstores and online
Click here to find your preferred online retailer